 JDK 6の導入
最終更新日:2013.08.14
警告: Java 1.6系は2013/2付けでEOLとなっています。常用はおすすめしません。
公式のJDK 6(1.6.x)系をダウンロードしてCentOS 5に導入する手順をまとめておく。
なお、インストール前にJDKおよびJREがインストールされていないか確認しておくこと。
JDKのダウンロード
(1)以下のページを開く
http://www.oracle.com/technetwork/java/javase/downloads/
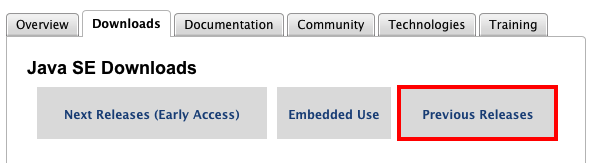
(2)「Previous Releases」をクリックして、アーカイブ版ページに移動する
(3)Oracle Java Archiveのページで「Java SE 6」をクリックする。
(4)Java SE 6 Downloadsのページで「Java SE Development Kit 6u45」(2013/8/14現在の最新版)をクリックする。
(5)"Accept License Agreement"を選んでライセンスに同意する

(6)rpm版とバイナリ版があるので、バイナリ版をダウンロードする。
- jdk-6u45-linux-x64.bin (64bit版)
- jdk-6u45-linux-i586.bin (32bit版)
JDKのインストール
(7)バイナリファイルを実行する
# sh jdk-6u45-linux-x64.bin
(8)自動的にホームディレクトリに展開される
:
Creating jdk1.6.0_45/jre/lib/javaws.jar
Creating jdk1.6.0_45/jre/lib/deploy.jar

Done.
(9)展開されたJDKを以下にコピーする
# cp -R jdk1.6.0_45/ /usr/lib/java-1.6.0/jdk1.6.0_45/
パスの登録と反映
(7)Javaのパスを登録する
# vi /etc/profile
:
: (末尾に追記)
#Export JDK
export JAVA_HOME=/usr/lib/java-1.6.0/jdk1.6.0_45/
export JRE_HOME=/usr/lib/java-1.6.0/jdk1.6.0_45/jre/
export CLASSPATH=.:$JAVA_HOME/lib:$JAVA_HOME/lib/tools.jar
export PATH=$JAVA_HOME/bin:$JRE_HOME/bin:$PATH
ポイント
この手順ではJDKとJDK組み込みのJREをパス登録しているが、実行環境は別のJREを使う場合、JRE_HOMEとして定義している方は記述しなくても良い。
(8)パスを反映させる
# source /etc/profile
確認
JDK
# javac -version
javac 1.6.0_45
:
JRE
# java -version
java version "1.6.0_45"
Java(TM) SE Runtime Environment (build 1.6.0_45-b06)
Java HotSpot(TM) 64-Bit Server VM (build 20.45-b01, mixed mode)
以上で導入が完了する。